Showing posts with label instance. Show all posts

Monday, June 23, 2014

EC2 Instance create date and time

Some times you may want to retrieve the creation date and time of an EC2 instance.
From the docs, an EC2 instance has the property launchTime(http://docs.aws.amazon.com/AWSEC2/latest/APIReference/ApiReference-ItemType-RunningInstancesItemType.html), you can easily build a boto script that queries for all instances and reports the launchTime(http://boto.readthedocs.org/en/latest/ref/ec2.html#module-boto.ec2.instance).

AWS EC2 user data

You can perform any bootstrapping action you would like using user data.  Here is an example of installing Apache, PHP, and MySQL.  Then Apache, PHP and MySQL are started.  Then a sample application is installed on Apache.

#!/bin/sh
yum -y install httpd php mysql php-mysql
chkconfig httpd on
/etc/init.d/httpd start
cd /tmp
wget http://us-east-1-aws-training.s3.amazonaws.com/self-paced-lab-4/examplefiles-as.zip
unzip examplefiles-as.zip
mv examplefiles-as/* /var/www/html

Sunday, June 22, 2014

AWS multiple PEM for on EC2 instance

You will probably want to have a different PEM file for each developer that will be accessing EC2 instances. This is good practice so that when a developer leaves the company or you want to remove their privileges to SSH into an EC2 instance. Here’s the link to create multiple pen keys for EC2 instances:

AWS ELB instances tied to ELB and ip addresses

The Amazon Elastic Load Balancer takes care of scaling out the number of underlying EC2 instances that make up the software virtual load balancer that is the Amazon ELB. However, you may want to determine the number of instances that are servicing your requests if you plan to scale out the number of users for a large promotion or for processing of a large number of users.  Determining the number of underlying instances is easy. You can simply use the host or dig commands using the ELB DNS name. There will be a minimum of one EC2 instance for each AZ that the ELB is servicing.

1. [ec2-user@ip-10-0-0-50 ~]$host ReachForceAutoScalingELB-1342887266.us-west-2.elb.amazonaws.com
ReachForceAutoScalingELB-1342887266.us-west-2.elb.amazonaws.com has address 50.112.140.192
ReachForceAutoScalingELB-1342887266.us-west-2.elb.amazonaws.com has address 50.112.183.144


2. [ec2-user@ip-10-0-0-50 ~]$ dig ReachForceAutoScalingELB-1342887266.us-west-2.elb.amazonaws.com

; <<>> DiG 9.8.2rc1-RedHat-9.8.2-0.17.rc1.28.amzn1 <<>> ReachForceAutoScalingELB-1342887266.us-west-2.elb.amazonaws.com
;; global options: +cmd
;; Got answer:
;; ->>HEADER<<- opcode: QUERY, status: NOERROR, id: 813
;; flags: qr rd ra; QUERY: 1, ANSWER: 2, AUTHORITY: 0, ADDITIONAL: 0

;; QUESTION SECTION:
;ReachForceAutoScalingELB-1142887282.us-west-2.elb.amazonaws.com. IN A

;; ANSWER SECTION:
ReachForceAutoScalingELB-1342887266.us-west-2.elb.amazonaws.com. 30 IN A 50.112.183.144
ReachForceAutoScalingELB-1342887266.us-west-2.elb.amazonaws.com. 30 IN A 50.112.140.192

;; Query time: 1 msec
;; SERVER: 10.0.0.2#53(10.0.0.2)
;; WHEN: Fri Jun  6 12:31:34 2014
;; MSG SIZE  rcvd: 113

Thursday, April 17, 2014

AWS Elastic Beanstalk and NAT instance

An Elastic BeanStalk launched in a VPC with a private subnet requires a NAT. Each instance needs to be able to talk to the Internet in order to answer the waitcondition. Connectivity can be provide through a NAT instance but there does have to be access to the internet.

The following show a VPC configuration with a private VPC. It is the connectivity to the Elastic Beanstalk end point that is needed. As you can see it is outside the VPC.

You can find more detailed instructions for creating and configuring a NAT instance here:

Monday, April 14, 2014

AWS high memory instance type : Good for Oracle Databases on AWS

The r3.8xlarage has 244 GiB of memory, 32 vCPUs, and 2 - 320 GB SSD drives. The cost is $2.80 per hour for on-demand instances.  More details here:

http://aws.amazon.com/about-aws/whats-new/2014/04/10/r3-announcing-the-next-generation-of-amazon-ec2-memory-optimized-instances/


Prior to this you had to use the i2.8xlarge instance type which also has 244 GiB of memory and 32 vCPUs. But also has 8 - 800 GB SSD drives which you will most likely not use for your Oracle Database.  The cost of i2.8xlage is $6.82 per hour for on-demand instances.  The other highest memory option is the cr1.8xlarge with 32 vCPUs and 244 GIB with 2 -120 GB SSD drives.  The cost of this option is $3.50 per hour for on-demand instances.
The R3 instances include the following features:
  • Intel Xeon E5-2670 v2 "Ivy Bridge" Processors
  • Hardware Virtualization (HVM) only
  • SSD-backed instance storage, including TRIM support
  • Enhanced Networking with lower latency, low jitter, and high packet-per-second performance

One caveat here that Oracle has not released any HVM-based instance types.  There are undocumented methods to create an HVM AMI from a PVM AMI but this new AMI may not be supported by Oracle.

Sunday, March 30, 2014

Redshift cluster sizes

100 nodes maximum for each configuration.
Dense Storage (DW1) nodes are available in two sizes.   These are HDD backed instances.
A. The Extra Large has three HDDs with a total of 2TB of magnetic storage. Maximum of 200 TB of storage.
B. The Eight Extra Large has 24 HDDs with a total of 16TB of magnetic storage. Maximum of 1.6 Pedabyte of storage. 
Dense Compute (DW2) nodes are also available in two sizes.  These are SSD back instances.
A. The Large has 160GB of SSD storage per EC2 instance with a maximum is 1.6 TB
B The Eight Extra Large is sixteen times bigger (then the dense compute large) with 2.56TB of SSD storage on the EC2 instance for a maximum of 256TB of SSD storage.

Wednesday, January 29, 2014

SAP HANA on AWS

There are two offerings for running SAP HANA on AWS
1. AWS Marketplace : https://aws.amazon.com/marketplace/pp/B009KA3CRY. This runs on the Cluster Compute 8XL (cc2.8xlarge) instance type with 60.5 GB of memory. This includes the SAP HANA One licenses. 
2. SAP Cloud Appliance Library (CAL) : http://marketplace.saphana.com/New/SAP-HANA-%3A-infrastructure-subscription-by-AWS/p/1871. This uses a AWS CloudFormation template to deploy a cr1.8xlarge cluster compute instance (244 GB of memory and 240 GB of SSD instance storage) with Amazon PIOPS volumes.

Monday, January 6, 2014

Instance types and network throughput

Network throughout is a very good metrics to know when running an Oracle Database on AWS or for any time you are moving data from different AWS services other AWS services. Maximum throughput for different Amazon EC2 instance types can be found here:
http://docs.aws.amazon.com/AWSEC2/latest/UserGuide/EBSOptimized.html

This 2013 AWS reInvent session also has details http://www.slideshare.net/AmazonWebServices/stg302-28617072 (Slide 19)


The m1.xlarge instance maximum network through put is 128 MBPS / 1K Mbps. The CC2.8xlarge, CR1.8xlarge, hi1.4xlarge, and cg1.xlarge (http://www.slideshare.net/AmazonWebServices/stg302-28617072) can provide up to 800 MPBS.

Friday, December 20, 2013

Oracle Database on SSD

 New options for running the Oracle Database on EC2 using SSD storage for your database. The I2 instances feature the latest generation of Intel Ivy Bridge processors - each virtual CPU (vCPU) is a hardware hyperthread from an Intel Xeon E5-2670 v2 (Ivy Bridge) processor. I2 instances are available in four sizes as listed in the table below.
Instance TypevCPUsECU RatingMemory (GiB)Instance Storage SSD (GB)Note          
i2.xlarge41430.51 x 800800 GB of SSD
i2.2xlarge827612 x 8001.6 TB of SSD
i2.4xlarge16531224 x 8003.2 TB of SSD. hi.4xlarge with 2 TB  of SSD was previously largest SSD instance type
i2.8xlarge321042448 x 8006.4 TB of SSD


The i2.8xlarge instance size is capable of providing over 365,000 4 kilobyte (KB) random read IOPS and over 315,000 4 KB random write IOPS.   Great for Oracle databases that have high IO requirements.  This document has more on configuring Oracle Databases on EC2 and using SSD based instances : http://cloudconclave.blogspot.com/2013/11/aws-database-reference-implementation.html
 

Thursday, December 5, 2013

Migrate EC2 instance from EC2-Classic account to EC2-VPC account

Here is the process to move a one EC2 instance from an EC2-Classic account to an EC2-VPC default account.

Create VPC
Note: since this is a new account, it will have a VPC by default. It will have one VPC, 3 subnets, 1 Network ACL, 1 Internet Gateway, 1 Route table by default. vpc-bb55bbd0 is the default VPC. 

We can use the default VPC or create a new one as well.

1. Create the VPC

a.     Click the Your VPCs link
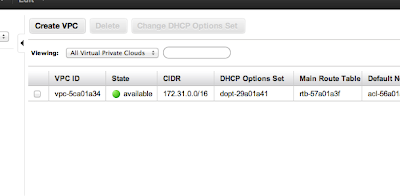
b.     Click the Create VPC button. (you will see your default VPC already created)
Note the VPC ID: vpc-e7262c85
c.     In the Create   VPC dialog box, enter a CIDR Block of 10.50.0.0/16.


d.     Click Yes, Create.
2 .     Create four subnets : two public and two private subnet. Want to so we can have a  Active-passive failover scenario. We will only use the two public subnets to start as there is no database back end.
Create Public Subnet in First AZ
a.     Select the Subnets link from the left hand menu.
b.     Click the Create Subnet button.


c.     Ensure that the VPC is set to the one created earlier.
d.     Choose an Availability Zone.
e.     Specify a CIDR Block of 10.50.1.0/24.
f.      Click Yes, Create.
Note : First public subnet: subnet-599d963b
3. Create Public Subnet in Second AZ
a.     Select the Subnets link from the left hand menu.


b.     Click the Create Subnet button.
c.     Ensure that the VPC is set to the one created earlier.
d.     Choose an Availability Zone.
e.     Specify a CIDR Block of 10.50.2.0/24.
f.      Click Yes, Create.
Note : Second public subnet: subnet-10714464

4. Create first private Subnet in First AZ
a.     Select the Subnets link from the left hand menu.
b.     Click the Create Subnet button.


c.     Ensure that the VPC is set to the one created earlier.
d.     Choose an Availability Zone.
e.     Specify a CIDR Block of 10.50.10.0/24.  (I jumped up to 10 to give more room for public subnet expansion on first AZ and started with 10 so all subnets in first AZ start with one).
f.      Click Yes, Create.
Note : First private subnet: subnet-389d965a

5. Create second private Subnet in second AZ
a.     Select the Subnets link from the left hand menu.
b.     Click the Create Subnet button.

c.     Ensure that the VPC is set to the one created earlier.
d.     Choose an Availability Zone.
e.     Specify a CIDR Block of 10.50.20.0/24.  (I jumped up to 10 to give more room for public subnet expansion on first AZ and started with 10 so all subnets in first AZ start with one).
f.      Click Yes, Create.
Note : Second private subnet: subnet-fe71448a


6.     Create Internet Gateway
a.     First step: Create Internet Gateway
b.     Then attach to VPC
Created : igw-9d0903ff
4.     Create route table for public subnet. Note: We will not create one for the private subnets at this time as no instances in them.
a.     Create a route table for the VPC


b.     Add the public route to the internet gateway to the route table


                                               i.     Add a route with a Destination of 0.0.0.0/0 and with Target set to the Internet Gateway.

c.      Associate the First public subnet: subnet-599d963b to the route table

d.     Associate the Second public subnet: subnet-10714464 to the route table


58.     Create Elastic IP : 54.201.96.147
69.     Create Security groups : ELB, WebTier
a.     ELB : Add a rule that allows TCP port 80 (HTTP) from 0.0.0.0/0 (everywhere, including the Internet). sg-c8a3b5aa


b.     WebTier  sg-58adbb3a


710.     No need to create NAT and route NAT to the Internet Gateway as have nothing in private subnet at this time.


Create ELB


1. Create ELB


2. Add health check


13.     Add subnets and security groups


Launch Instance


1.     Could not use the AMI from the old account as was not valid. 
2.     Launched instance from AMI eligble for free tier.
3.     Created snapshot of EBS root volume in old account
4.     Gave permissions on new account to snapshot – snap-8fd359b4
5.     aws ec2 describe-snapshots --snapshot-ids snap-8fd359b4
6.     aws ec2 create-volume --snapshot-id snap-8fd359b4 --size 8 --availability-zone us-west-2a
7.     aws ec2 describe-volumes --volume-ids vol-41a11c68
8.     aws ec2 stop-instances --instance-id i-c12ca6f7
9.     aws ec2 detach-volume --volume-id vol-2ba51802
10.  aws ec2 attach-volume --volume-id vol-41a11c68 --instance-id i-c12ca6f7 --device /dev/sda1
11. aws ec2 start-instances --instance-id i-c12ca6f7
13. need to attach to ELB. I did this in the console
14. Needed to start apache as forgot to include in user data: sudo /etc/init.d/httpd start
15. Test on Elastic IP address : 54.222.94.234 (worked so closed HTTP on instance for 0.0.0.0/0)
17. Test running instance before migrating route 53: LoadBalancer-788377229.us-west-2.elb.amazonaws.com

Migrate Route 53


1.     Create hosted zones
2.     Create record sets
3.     Go to your domain name registry (in this case godaddy) and launch (godaddy terminology) your domain name to set your Nameservers.  Use the four name services/delegation set retrieved in step 1.

Decommission the old account 

1.     Spin down EC2 instance
2.     Decommision Route 53
3.     Delete all EBS volumes and snapshots