Here is the process to move a one EC2 instance from an EC2-Classic account to an EC2-VPC default account.
Create VPC
Note: since this is a new account, it will have a VPC by
default. It will have one VPC, 3 subnets, 1 Network ACL, 1 Internet Gateway, 1
Route table by default. vpc-bb55bbd0 is the default VPC.
We can use the default VPC or create a
new one as well.
1. Create the VPC
a. Click the Your VPCs link
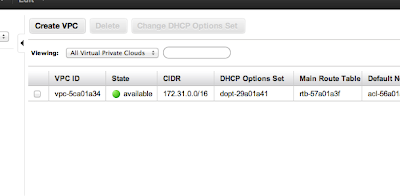 b. Click
the Create VPC button. (you will
see your default VPC already created)
Note the VPC ID: vpc-e7262c85
b. Click
the Create VPC button. (you will
see your default VPC already created)
Note the VPC ID: vpc-e7262c85
c. In
the Create VPC dialog box, enter a CIDR Block of 10.50.0.0/16.
d. Click Yes, Create.
2 .
Create four subnets : two public and two
private subnet. Want to so we can have a Active-passive failover scenario. We
will only use the two public subnets to start as there is no database back end.
Create Public Subnet in First AZ
a. Select the Subnets link from the left
hand menu.
b. Click the Create Subnet button.
c. Ensure that the VPC is set to the one
created earlier.
d. Choose an Availability Zone.
e. Specify a CIDR Block of 10.50.1.0/24.
f. Click Yes, Create.
Note : First public subnet: subnet-599d963b
3. Create Public Subnet in Second AZ
a. Select the Subnets link from the left
hand menu.
b. Click the Create Subnet button.
c. Ensure that the VPC is set to the one
created earlier.
d. Choose an Availability Zone.
e. Specify a CIDR Block of 10.50.2.0/24.
f. Click Yes, Create.
Note : Second public subnet: subnet-10714464
4. Create first private Subnet in First AZ
a. Select the Subnets link from the left
hand menu.
b. Click the Create Subnet button.
c. Ensure that the VPC is set to the one
created earlier.
d. Choose an Availability Zone.
e. Specify a CIDR Block of 10.50.10.0/24. (I jumped up to 10 to give more room for public
subnet expansion on first AZ and started with 10 so all subnets in first AZ
start with one).
f. Click Yes, Create.
Note : First private subnet: subnet-389d965a
5. Create second private Subnet in second AZ
a. Select the Subnets link from the left
hand menu.
b. Click the Create Subnet button.
c. Ensure that the VPC is set to the one created
earlier.
d. Choose an Availability Zone.
e. Specify a CIDR Block of 10.50.20.0/24. (I jumped up to 10 to give more room for
public subnet expansion on first AZ and started with 10 so all subnets in first
AZ start with one).
f. Click Yes, Create.
Note : Second private subnet: subnet-fe71448a
6.
Create Internet Gateway
a.
First step: Create Internet Gateway
b.
Then attach to VPC
Created : igw-9d0903ff
4.
Create route table for public subnet.
Note: We will not create one for the private subnets at this time as no
instances in them.
a.
Create a route table for the VPC
b.
Add the public route to the internet
gateway to the route table
i. Add a route with a Destination of
0.0.0.0/0 and with Target set to the Internet Gateway.
c.
Associate the First public subnet: subnet-599d963b to the route table
d.
Associate
the Second public subnet: subnet-10714464 to the route table
58.
Create Elastic IP : 54.201.96.147
69. Create Security groups : ELB, WebTier
a.
ELB : Add a rule that allows TCP port 80 (HTTP) from 0.0.0.0/0
(everywhere, including the Internet). sg-c8a3b5aa
710.
No need to create NAT and route NAT to
the Internet Gateway as have nothing in private subnet at this time.
Create ELB
2. Add health check
13.
Add subnets and security
groups
Launch Instance
1.
Could
not use the AMI from the old account as was not valid.
2.
Launched
instance from AMI eligble for free tier.
3.
Created
snapshot of EBS root volume in old account
4.
Gave
permissions on new account to snapshot – snap-8fd359b4
5.
aws ec2
describe-snapshots --snapshot-ids snap-8fd359b4
6.
aws
ec2 create-volume --snapshot-id snap-8fd359b4 --size 8 --availability-zone
us-west-2a
7.
aws ec2
describe-volumes --volume-ids vol-41a11c68
8. aws ec2 stop-instances --instance-id
i-c12ca6f7
9. aws ec2 detach-volume --volume-id vol-2ba51802
10. aws ec2 attach-volume --volume-id vol-41a11c68 --instance-id i-c12ca6f7 --device /dev/sda1
11. aws ec2 start-instances --instance-id
i-c12ca6f7
13. need to attach to ELB. I did this in the
console
14. Needed to start apache as forgot to
include in user data: sudo /etc/init.d/httpd start
15. Test on Elastic IP address : 54.222.94.234 (worked so closed HTTP on instance for 0.0.0.0/0)
17. Test running instance before migrating
route 53: LoadBalancer-788377229.us-west-2.elb.amazonaws.com
Migrate Route 53
1.
Create hosted zones
2.
Create record sets
3.
Go to your domain name
registry (in this case godaddy) and launch (godaddy terminology) your domain
name to set your Nameservers. Use the
four name services/delegation set retrieved in step 1.
Decommission the old account
1.
Spin down EC2 instance
2.
Decommision Route 53
3.
Delete all EBS volumes
and snapshots


